
[HTML5 Web storage is supported in IE 8+, Opera,
Chrome, Firefox, and Safari]
In HTML5, web pages can now store data in the user’s
browser, instead of using cookies. Web Storage is more secure and faster.
Local Web Storage in HTML5
It is now possible to store large amounts of data in the
client side, affecting in a positive way the website’s performance.
The data is stored in a localStorage object,
a Collection structure based on key/value pairs, stored as strings.
We must convert them to the required format when needed.
- Can a web page access data stored
by another web page? NO: a page can only
access data stored by itself.
There are two kinds of Web Storage in HTML5: SESSION
WEB STORAGE and LOCAL STORAGE.
The difference between them are related to the duration of storage:
The difference between them are related to the duration of storage:
- 1- SESSION
STORAGE: data is stored in client side until
the session ends.
- 2- LOCAL STORAGE:
data is stored in client side with no
expiration date!!!!
The HTML5 Local Web Storage object stores
the data not just for one session, but even when the user closes the browser
window, the data is persisted in the user’s local machine.
You can also use local storage in the browser, which is good
even if the user closes the tab, the window or the browser itself.
However, if you open another browser, the localStorage object will be initialized by itself, meaning that there will be now TWO localStorage objects in your machine, each one corresponding to each browser. If you are using Chrome and also IE, each one will have its ownlocalStorage object.
However, if you open another browser, the localStorage object will be initialized by itself, meaning that there will be now TWO localStorage objects in your machine, each one corresponding to each browser. If you are using Chrome and also IE, each one will have its ownlocalStorage object.
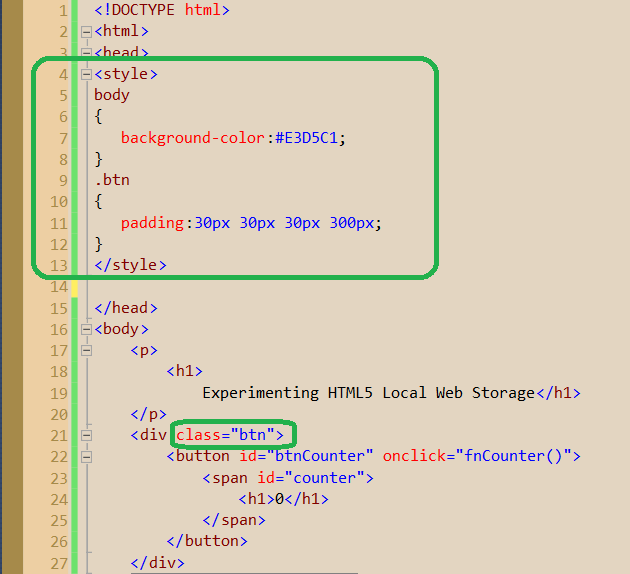
1. To use the Local Web Storage HTML5 feature, add to
your html page a button containing a counter. We’ll see how the counter
is stored permanently inside the user’s browser, beyond the web session:


2. Next, let’s add some css style to our page:

3. Now create a script as a head child.
Inside the script type the function you just linked to the onclick button’s
event:


The code check whether the Storage object has been
initialized, meaning that the browser supports it.
<script>
function fnCounter() {
if (typeof (Storage) !== “undefined”) {
if (localStorage.counter) {
localStorage.counter = Number(localStorage.counter) + 1;
}
else {
localStorage.counter = 1;
}
document.getElementById(“counter”).innerHTML = “<H1>” + localStorage.counter + “</h1>”;
function fnCounter() {
if (typeof (Storage) !== “undefined”) {
if (localStorage.counter) {
localStorage.counter = Number(localStorage.counter) + 1;
}
else {
localStorage.counter = 1;
}
document.getElementById(“counter”).innerHTML = “<H1>” + localStorage.counter + “</h1>”;
}
else {
document.getElementById(“counter”).value = “Your browser does not support HTML5″;
else {
document.getElementById(“counter”).value = “Your browser does not support HTML5″;
}
}
</script>
}
</script>
4. Nested beneath the “if” clause, build a “if then else”
block to check whether the page has just loaded and the stored key/value must
be initialized:

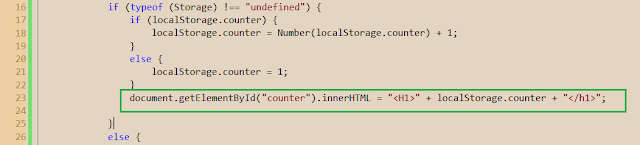


5. If so, just increment the counter value:


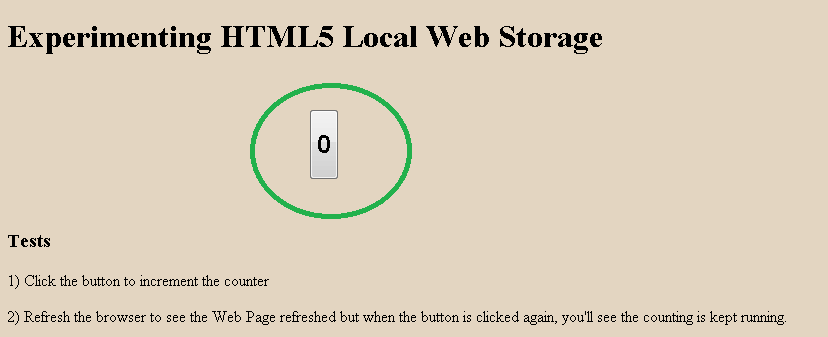
7. Having finished to code, let’s test it:


8. Load the web page. Click the button to increment the
counter, and refresh the browser to see that the value has been persisted:

9. Next, open another Browser Tab with the same URL, to
check that the counter is kept running: that’s because each session

10. Increment the counter by pulsing the button:


11. Close the browser, reopen it and you’ll see that the
stored data has been KEPT AND PERSISTED and therefore the counter continues
incrementing:
That’s all: enjoy HTML5!!!
עריכה: כרמל שוורצמן


